This page walks you through the basics of creating a guide, adding content, and publishing your guide. For more information about specific content types or reusing content, check out the Assets, Images, and Reusing Content tabs at the top of the guide.
There are two ways to create a new guide. The first is through the LibGuides Dashboard shortcuts box:
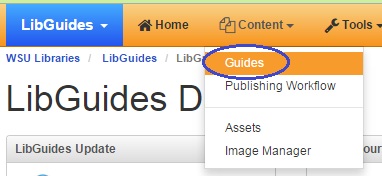
The second way to create a new guide is through the LibGuides Universal Command Bar

This is where you can choose whether or not you want your to create a guide from scratch or reuse an existing guide. If you select "Start fresh" this is also where you select either a tabbed navigation or side navigation for your guide. For more on this choice, check out the WSU LibGuides Best Practices Layout information guide:
This is where you name your guide. Choose something meaningful and memorable!
You can enter a brief description of your guide here. This can help users figure out what your guide is about.
We have four types of guides. Assigning a Guide type is mainly for internal organizational purposes, but assigning the correct guide type helps with generating meaningful statistics.
This is where you can choose to which group your LibGuide belongs. Groups are displayed on the LibGuides homepage, and selecting the group that is the best fit for your guide will help users find it more easily.
Leave this blank unless you want to password protect your guide. Adding a password means that only users with the password can see your guide.
This is where you select how available you want your guide content to be to other LibGuide authors.
 To add additional pages to your guide click the large plus symbol button found below the left-hand navigation.
An "Add / Reuse Page" window will appear. Give the new page a meaningful name (like "Find Articles") and, if you like, a brief description like "This page shows a few recommended ways to locate article content for Strategic Communication." You should leave the other options at their default values.
Click "Save" to apply the changes.

Now, you should see a blank LibGuide page. From here you can add boxes and content.
When you start with a new guide, you should see a blank guide with an three-column template layout. A profile box has been automatically placed in the right-most column. You can now add boxes. As with LibGuides v1, each time you add a new box, you will be asked to name the box.
Types of Boxes - An important and wonderful improvement that you will see in LibGuides v2 is that you can include multiple kinds of content in your boxes. You can also create tabbed boxes like the one you're looking at now (but please, do this with discretion!). Here is information on the various box types:
The Top Box - If you create a guide with tabbed navigation in LibGuides v2, you can add a top box to any of the pages in your guide. The top box spreads across the top of your page, acting almost as a header for that page. Top boxes are good places to place introductory text or to insert meaningful images.
Boxes in Columns - To add boxes to your columns, just click on the Add Box at the bottom of the column to create a new box or reuse a box from another LibGuide.
The Bottom Box - The bottom box spreads under all of the columns in your guide. Only available in guides with tabbed navigation (if you decide to use side navigation, top and bottom boxes aren't available).
 LibGuides makes it easy to put links into your boxes.Click on the Add/Reorder menu that you see in your box. This opens up a menu of different types of content to add to your box. If you want to create or reuse a link, select Link.
Once you have selected the Link Asset, you will be taken to a screen where you can choose to create a new link or reuse an existing link:

When you create a new link, you enter the link name, and URL. You can also add a brief description and/or more information about the link. Every time you create a link in LibGuides v2, that link will be added to your Assets so that you can reuse it. You can also associate links with particular subjects if you so desire.
To reuse a link, click on the Reuse Existing Link tab. This will allow you to search for the link you want to use and add it to your box.
 1. To add an image to your Guide, you need to work with the Rich Text/HTML content type. To create a new piece of Rich Text/HTML content in a box, click the box's Add / Reorder button, and select Rich Text/HTML from the available options.

If there is an existing piece of rich text content to which you'd like to add an image, go the the small pencil icon at the bottom of that piece of rich text content, and click on it to open the edit screen.
 2. Once you are in edit mode for the Rich Text/HTML to which you'd like to add an image, look for and click on the image button, which looks like a small, framed picture of a mountain.
An Image Properties window will appear.

3. Click on the Browse Server button to bring up the Image Manager window. From the Image Manager screen you can select an image from your Personal Library of images, select an image from the Shared Library, or click on Upload New Image to upload and use an image from your computer.
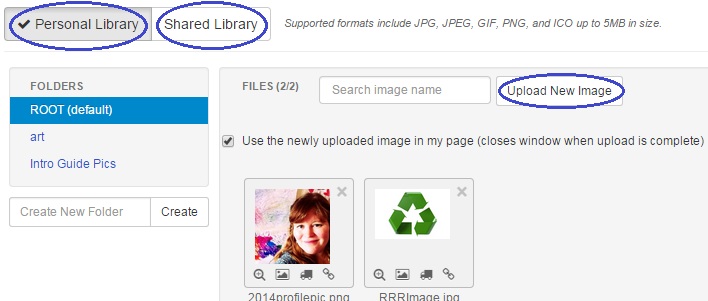

To select an image from your personal library or the shared library, click on the small picture icon under the image.
4. If you upload a new image to use or if you click on the picture icon of an image currently in your image library, this will fill out the image properties window with information about the image you've selected. This is where you can adjust the image size, add alternate text, and decide to align your image on the left or right side of the box you are working on.
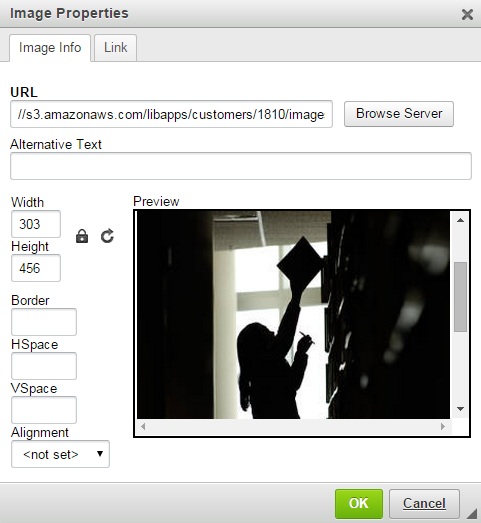
6. Click on OK to add the image to your rich text box.
Look to the top of the screen to edit your guide's attributes (title, description, URL, Subjects, and Tagging. You can edit wherever you see a dashed underline or a small pencil icon.
To edit the title of your guide, click on any of the title text with the blue dashed underline. This will pull up a box where you can change the title of your LibGuide.Click on the blue checkmark button to save your change.

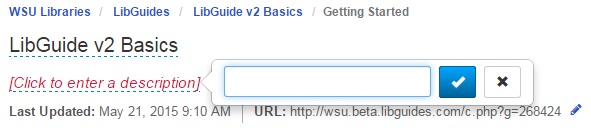
To change or add a description for your LibGuide, click on the Description text with the blue dashed underline. If you haven't added a description to edit, you will see red text that reads "Click to enter a description." Clicking on the red text will bring up a box where you can add a description.
Creating a friendly URL is a good way to make it easier for people to find and remember how to get to your guide. To add a friendly URL, click on the small pencil icon next to the URL that appears next to the Last Updated information at the top of the screen. This will open up a popup window where you can add or change your URL.

Keep your friendly URL friendly by making it brief and meaningful. Try to avoid using spaces and capital letters in your URL.
To assign a subject category to your LibGuide, click on the small pencil icon next to Subjects, under the guide's Last Updated and URL information. Clicking the pencil icon will open up a window where you can select the subject you want from a list.
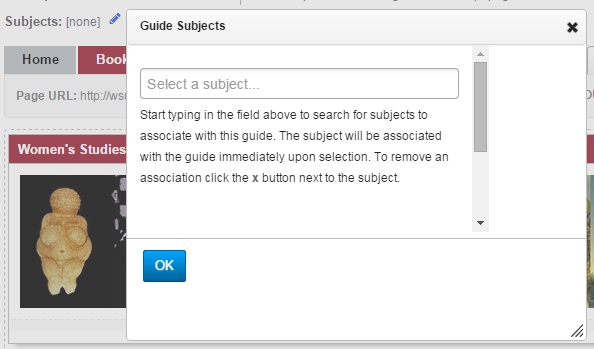
If you are looking for a subject that you don't see in the list, please contact Erica Nicol or Jane Scales.
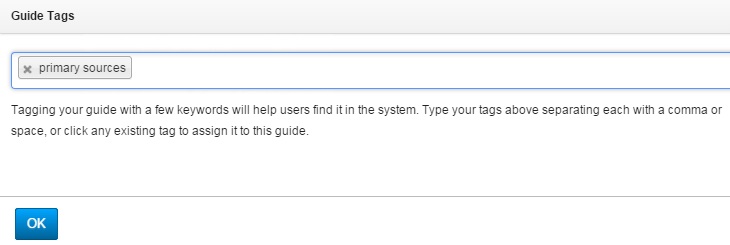
Tags are another way to help our users find content. They are fairly informal search terms we can add to our guides so that when users search LibGuides they will see results tagged with their search terms as well as guides with indexed content that matches their search terms.
To add a tag or tags to your guide, click on the small pencil icon next to Tags at the top of your guide. Then select tags from the shared tags list or create your own, separating multiple tags with commas.
In LibGuides v2, each of the pages in your guide can be customized. If you are using a guide with Tabbed layout, the page customization options appear just under the tabs when you are in edit mode. If you are using a guide with Side Navigation, these page customization options appear just above the left-hand navigation.


A page's title (also called "name" in other instances) and description can be changed by clicking on the "Page" button ( ) and selecting "Page Properties" from the drop down menu. A window will appear where the page title and description can be edited.
From the window, you can also reorder pages, boxes, and content items on your guide as well as delete the page.
Remember to click "Save" to apply changes to your pages.
LibGuides has a few column layout configurations to help organize the placement of boxes on a page. By default, the layout you will see when creating a guide is a 3-column with a 25 / 50 / 25 page width. Those numbers are percentages of the entire page width.
If you are working in a guide using tabbed navigation, you can click on the Layout button ( ) to see the options for changing and customizing column widths. Since LibGuides is working with responsive design (hurray) that will display better on different sizes of devices, all the column widths are percentages of the entire page width instead of pixels (as we used previously).
If you choose to create a guide using side navigation, you will not see the button. This is because, when working in a side-nav guide, you must use the default column layout - 25 / 75.
To change the navigation style of your LibGuide, you can always go to the top right corner of your screen and look for the Guide Layout button. It looks like a small picture with a drop-down arrow next to it:

If you click on the layout button, Guide Navigation Layout will be the first item on the drop-down menu. Click on Guide Navigation Layout to change your guide from Side-Nav to Tabbed or from Tabbed to Side-Nav.